Tuesday, November 15, 2011

The Spliced Dress (aka: tank top + skirt)

Disclosure: This post may contain affiliate links. If you purchase those items through my links I earn a commission. You will not pay more when buying a product through my link. Plus, when you order through my link, it helps me stumble along in this bloggy blog world! I appreciate your support! My husband who has to put up with my craft supply obsession does too :D All opinions expressed are my own, and I am not sponsored by any product manufacturer unless otherwise stated :)

____________________________________________________


Hello friends! I would like to apologize for my absence the past month or so; I fell off a pipe at the beach and did a fabulous job at injuring myself. BUT I am happy to say that I'm all healed up and back to my crafting ways bwahaha. ANYWAY.

So this idea is not originally mine by any means; its your basic pre-made tank top attached to a skirt to make a dress concept, but I had always wanted to try it so here is my take :)

The tank top I started out with was this one. I (one day, while snooping through the trash, like usual) fished it out of an old bag of clothing that was destined for a probably dismal fate. (Actually, to be honest, it wasn't this tank top exactly; it was one EXACTLY like it, only blue. But I didn't take a picture of it before I cut it up because I didn't think this would actually work ^.^)


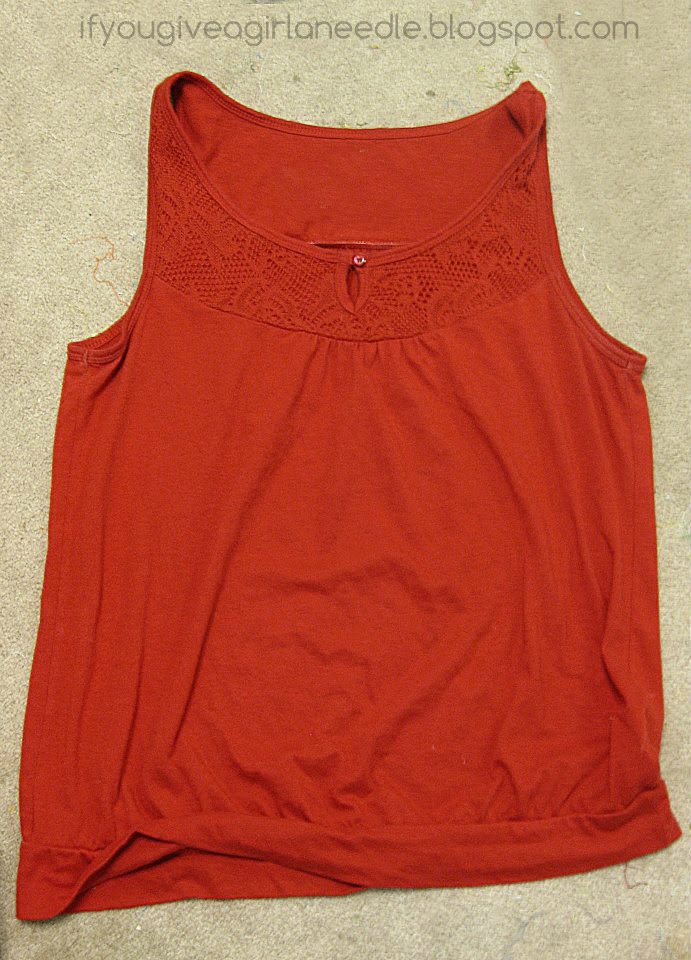
I liked the detail over the yoke/collar a ton. The shirt, however, was gigantic on me, and the front had a habit of hanging dangerously low when I moved about. I AINT A LOOSE WOMAN.


I took in the sides but the top was still too low in the front for my tastes. SO I got to thinking, 'Hey, the back of the shirt is equally awesome...LETS TURN IT AROUND!'

So I did!


The skirt fabric was a jewel. It is a silk blend that was half-off at Jo-Ann's, plus I had a coupon, PLUS it was the last of the bolt so I got another percentage off! I got about 3 yards of it for like $5! I LOVE bright patterns!

I also like how it has a sort of vintage vibe. Or maybe that is just me, hehe. I am on the prowl for a belt to wear with it, to kinda break up the piece a little bit.


(if the skirt looks uneven, it is, well, because it is...its only pinned in this picture!)


The back.
It is kinda difficult to tell on the mannequin, but the button and keyhole add a cute addition the the back neckline. It falls in just the right place and is kind of unexpected!


Again, thank you all for your interest and support! It means so much to me!

Toodlieos!
-J.

**Edit: Creepy Myspace Mirror Action Shots complete with funnay facess...


I normally act this way....


The back, for perspective. I lost my camera so I had to resort to using the cellyphone, sorry for the potato picture quality!


Okay yes, I realize how creepy and 14-year-old-girl-y I look here...I'm sorry! I don't like my picture taken...even by me! lol


Thanks for stopping by!
J


Tuesday, September 20, 2011

Old Rake Belt Hanger!

Disclosure: This post may contain affiliate links. If you purchase those items through my links I earn a commission. You will not pay more when buying a product through my link. Plus, when you order through my link, it helps me stumble along in this bloggy blog world! I appreciate your support! My husband who has to put up with my craft supply obsession does too :D All opinions expressed are my own, and I am not sponsored by any product manufacturer unless otherwise stated :)

____________________________________________________

I love going to yard sales because you really never know what people will try to sell, and what you will find! I found this beauty a few weekends back at a community yard sale for $0.50! I went to buy it and the lady selling asked if I liked gardening...I said 'not very much' and she looked at me funny, probably wondering what I was going to do with a rusty old rake head.

MAKE A BELT HANGER OF COURSE. I had seen someone use one of these for hanging necklaces (super fab idea!) and I figured I would use it for my belts.

Before...


All I did was scrub it off, and add some broken jewelry pieces I had been hanging on to! Super easy!


 Thank you all so much!

Toodlieos!
-J.

Sunday, September 18, 2011

Knock-off Anthropologie Rosette Bedding *MINI TUTE*

Disclosure: This post may contain affiliate links. If you purchase those items through my links I earn a commission. You will not pay more when buying a product through my link. Plus, when you order through my link, it helps me stumble along in this bloggy blog world! I appreciate your support! My husband who has to put up with my craft supply obsession does too :D All opinions expressed are my own, and I am not sponsored by any product manufacturer unless otherwise stated :)

____________________________________________________

Many of you had asked how I made my bedspread, so I put together a pseudo tutorial of how I did the little bunchy square. Thingies.

ONWARD.

(My apologies in advance, I didn't take many pictures while I was making it, and the ones I did were kinda sketch...so...bear with please!)

and...ONWARD.

1. So firstlies, you are going to need a horrific amount of fabric. The original bedspread is made of jersey, so that is what I used. My local Dirt Cheap had just gotten in a shipment of huge white Hayne's t-shirts and I bought about 45 (they were $0.50 each!) You, of course, can use whichever fabric you desire! Another idea is maybe finding some jersey sheets, or just outright buying fabric.

2. Okay. You are going to want to lay out your shirt(s), and cut off the sleeves and neck, staying as close the edges as you can to optimize fabric useage. (You should have two pieces, a front and back)

Lay out your shirt

Cut off sleeves and neck in straight lines
3. Locate the approximate center of your current square/rectangly piece of fabric, and pinch it...


PINCH IT! :)

...then pull it up, and lay it down. (Sounds confusing, but basically make a ghost shape out of your fabric square) 

Sideways ghost! 
4. Next, take some strong white thread or embroidery floss...


...and tie off the tip (will end up being the middle) of your fabric, leaving about two inches on the short end.

Knot it TIGHTLY!
When you open it back up, you should have a little puff!


For added strength, go back and forth through the base of your puff a few times with your needle and thread.


 5. Next, with a new strand of thread, come up from the bottom of your puff, poke through the center...


...and go back down through the puff. I did this three or four times per puff :)


 And it gives it that nice 'rosette' look.


6. Take a piece of square paper in the dimensions of your choice, and lay it (centered) on top of your fabric square. I just used a standard piece of scrapbook paper, and it worked out great!


Then, using your square paper as a guide/template, cut the excess fabric off of the sides of your square. Rotary cutters work FABULOUSLY for this.

You should end up with something like this!
 7. Now, repeat steps 1-6 about a billion times! I popped in my Doctor Who DVDs to help pass the time :)

8. Once you have a nice stack of squares made, take 2, right sides together, and pin the corners on one side.


9.  Due to the nature of stretchy fabric and my sketchy measurements, not all of your pieces will line up exactly. This is good; it adds to the pleated-ness. With your corners pinned on one side, pleat the fabric squares so they line even out and line up.


10. Then pin your pleats good and tight...and sew a straight line. I like to leave a good 1/2 inch seam allowance, just because (a) its a bedspread and I flop around in my sleep alot, and (b) its jersey and tends to stretch and pull. In hindsight, I could have serged the edges...but...I...didn't...?


11. Now, repeat this process until you have several rows of 5-6 squares apiece. I have a twin bed and mine ended up being 6 squares wide by 7 long. Once you have your rows, sew them together until your bedspread is long enough. (I'm sorry if that is confusing, I didn't take ANY pictures after I made the squares!)

12. Once I had my squares all sewn like I wanted them, I picked up a full-sized regular white comforter, and, right sides together with my puffy squares part, sewed along the edges, and cut off the excess. Remember to leave an opening to turn your project right side out! :D

13. As far as actually quilting, I simply stitched the corners, due to the bulk of the project. It helps if you work from the middle, stitch the corners of the very middle square, and go out from there!

Once I get the pillows made, I'll post those!

I'm sorry if that was crazy confusing! I kinda flew by the seat of my pants as it was! To be honest, I really didn't think it would turn out, so I kinda half-did alot of it =/

Questions? Thoughts??

Toodlieos!
-J


Saturday, September 17, 2011

Suitcase Sidetable (IT IS YELLOW)

Disclosure: This post may contain affiliate links. If you purchase those items through my links I earn a commission. You will not pay more when buying a product through my link. Plus, when you order through my link, it helps me stumble along in this bloggy blog world! I appreciate your support! My husband who has to put up with my craft supply obsession does too :D All opinions expressed are my own, and I am not sponsored by any product manufacturer unless otherwise stated :)

____________________________________________________

I had a few people comment on the suitcase table in my previous posts, so I thought I'd just give an little overview of how that came about :)

I love all things old, vintage, and yellow, so when I ran across this suitcase in the thrift store a few months back I was ecstatic!


I whisked it home, with starry eyes full of ideas and dreams, cleaned it up, and...

...let it sit in the closet for 3 months while I hem hawed about what I wanted to do with it.

*sigh*

It would remain sitting in said closet until a few weeks later when I espied my mother dearest headed to the garbage with THIS PERFECTLY USABLE PIECE OF WOODINESS!


I almost grew a heart defect right then and there. Now, you can't really blame my mother for trying to sneak this into the trash before I saw it, because I have a VERY bad tendency to throw NOTHING away and let it be added to my ginormous pile of well-intentioned craft projects. 

So I was given an ultimatum; Either I actually USE the table in the next three days, or to the trash it went.

That simply wouldn't do. It was about that time that I remembered my suitcase...and with a little finagling and  sawing and sanding, I had a bedside table.


I can only imagine how confused the suitcase probably is right about now ;)

As to the logistics;

1. I unscrewed the original wooden table top and set aside (into the well intentioned future project pile)

2. Gave everything a good sanding with some medium grit sand paper.

3. About 2 coats of primer, 4 coats of silver Krylon, and 1 coat of Valspar clear enamel sealer.

4. I cut a piece of MDF to fit (snugly) the bottom of the suitcase, and drilled several screws through the MDF, suitcase, and into the table in a circular pattern. 

I can still open it up and store random stuff in it if I need to! 

Thank you so much, everyone!

Toodlieos!
-J.

Tuesday, September 13, 2011

$1 Broomstick Skirt Reconstruction (Also, my dying experiment from the great beyond)

Disclosure: This post may contain affiliate links. If you purchase those items through my links I earn a commission. You will not pay more when buying a product through my link. Plus, when you order through my link, it helps me stumble along in this bloggy blog world! I appreciate your support! My husband who has to put up with my craft supply obsession does too :D All opinions expressed are my own, and I am not sponsored by any product manufacturer unless otherwise stated :)

____________________________________________________


So recently I've noticed its an almost impossible task to walk into any store and not stumble across one of these type skirts. They have like a jillion different names; gypsy skirts, broomstick skirts, witch skirts, peasant skirts and so forth. I just stick with 'broomstick' because its the least racially profiling. Bahaha, no that is just what I was always told theywereanywaymovingON.

I picked up one of these said skirts at the thrift store for $1...why, I'm not sure, but it sat in my closet for FOREVER and I never wore it. 


It really wasn't that flattering anyway, thusly it stayed in the closet. One day I snagged a few packages of Dylon dye (lovveeee) from a bargain bin in Sunflower Yellow and Bahamas Blue, just cause I liked the bright colors. I got home, and remembered, 'Yo Jordan, you have that old ugly skirt in the closet, go fetch it down and lets DYE.' 

Even though I'd never dyed (lol) before, I thought that sounded like a totally fab idea. So into the workroom sink went the yellow dye and in went the skirt.

Totally forgot the skirt wasn't white, and it came out this LOVELY mustard-gone-wrong color which was uglier than the original color.

Woopsiee....

So then I thought, "Yo Jordan! Just dye it blue, you have a package of blue dye!'

So into the workroom sink went the blue dye and the skirt. Well, HALF the skirt, I left it sitting on the edge and completely forgot about it, until 45 minutes later when it had only colored half of it.

And whadoyouknow? Yellow + blue = green! Forgot about that one too.

Woopsiee...

In the end, I liked the ombre effect, but not the shape of the skirt...BUT with some brainstorming and hacking, I finally managed to end up with something wearable :)

**WARNING BATHROOM SHOT**


I love high wasted skirts! Whadoyouthink?

Toodlieos!
-J.

Saturday, September 10, 2011

Bedroom Makeover...COMPLETED!

Disclosure: This post may contain affiliate links. If you purchase those items through my links I earn a commission. You will not pay more when buying a product through my link. Plus, when you order through my link, it helps me stumble along in this bloggy blog world! I appreciate your support! My husband who has to put up with my craft supply obsession does too :D All opinions expressed are my own, and I am not sponsored by any product manufacturer unless otherwise stated :)

____________________________________________________

It only took forever, but I finally finished my bedroom! *rejoicing* So enough talking and more pictures! (If you would like to refresh your memory of the delightful 'before' post, check it here!)


I really love my new room! And that it's finished, lol! 
Toodlieos!
-J.

DIY Anthropologie Bedding...From T-Shirts!

Disclosure: This post may contain affiliate links. If you purchase those items through my links I earn a commission. You will not pay more when buying a product through my link. Plus, when you order through my link, it helps me stumble along in this bloggy blog world! I appreciate your support! My husband who has to put up with my craft supply obsession does too :D All opinions expressed are my own, and I am not sponsored by any product manufacturer unless otherwise stated :)

____________________________________________________


So I pretty much would furnish my entire house with Anthropologie stuff if I had enough room and enough money. Seeing as I don't really have either of those, though, I have to resort to knocking it off myself. I have drooled over this bedspread for the better part of a year, but could never bring myself to spending $300+ on it.


I think what I liked most about it was that it was made out of jersey knit, which is unbelievably comfortable, especially for bedding. Which got me to thinkin'...'What else is made from jersey knit that you can find a bunch of probably at a thrift store???'

...

T SHIRTS.

So I picked up about 50 extra huge man t shirts for $30, and a plain white king-sized bespread that I already had laying about, chopped them up, and ended up with my own version...


IT IS SO SOFT. I was actually really pleased with how it came out! I am working on some matching shams, but I haven't got around to finishing them yet!

Some in progress...


Thanks for looking!

Toodlieos!
-J.

Monday, August 29, 2011

Delightful DIY Decoupaged Dresser!

Disclosure: This post may contain affiliate links. If you purchase those items through my links I earn a commission. You will not pay more when buying a product through my link. Plus, when you order through my link, it helps me stumble along in this bloggy blog world! I appreciate your support! My husband who has to put up with my craft supply obsession does too :D All opinions expressed are my own, and I am not sponsored by any product manufacturer unless otherwise stated :)

____________________________________________________

I NEVER spell 'decoupage' correctly the first time. Everrrr.

Anyway.

So I've recently seen a swarm of decoupaged furniture swirling about the interwebs, and have been itching to try it out. The possibilities are seriously limitless, and only confined to what you can get your hands on!

So this is what I started with...


And here is what I ended up with...


A brief breakdown...

1. Moved everything outside. (Hard when you have no muscle like me)


2. Gave everything a good sanding.


3. Spray-primed everything, then did 2-3 layers of satin white paint.


4. Sanded. Again.


5. Cut fabric to fit the drawer fronts, and hit those with 7-8 layers of Hard Finish ModPodge, sanding every two layers with 400 grit (super fine) sand paper.

6. Coated with some acrylic sealer.

7. Painted the hardware and DONE.


It really wasn't as hard as I thought it would be! The hardest was waiting for everything to dry, I think. And getting the fabric to fit right. Oh dear. That was a chore. 

This can be used with fabric or paper, whichever you wish! 

Toodlieos!
-J.
Related Posts Plugin for WordPress, Blogger...